Ready for summer? This diy water park can turn your backyard into the funnest place on earth — while staying within your budget! Created by a mom on a budget, this water park is just one way to create an unforgettable summer for your kids!
Most children love splashing and playing in the water. It’s a great way to cool off and make tons of fun memories!
Knowing many of my favorite childhood memories were made around water fun, I wanted to do something special for my children. I wanted to pass a heritage of summer fun onto them. I’m nostalgic, I know, but nolstagia can really get a mom’s creative juices flowing! And I wanted to think beyond the sprinkler. You know — something that would knock their socks off!
Our family saved money for a pool, but I didn’t feel the timing was right for such a large purchase. So what could a frugal, creative mom do?

Realizing a pool was not in their near future, our kids asked to spend the budgeted pool money on a slip n slide.
At the sound of their request, my mind began racing with images of water running all over the lawn, over grown grass and bored, sore children from trying to slide on flat ground. Sigh. Maybe a slip n slide wasn’t the solution either — or maybe it was part of the solution!
“What if I put the slide on a hill?” I thought to myself.
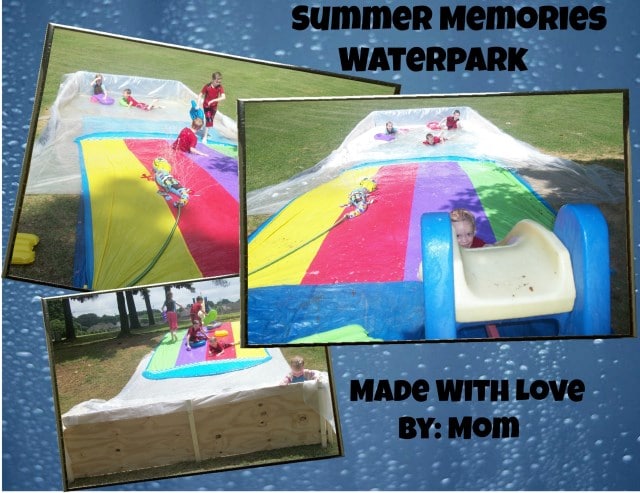
Suddenly my creative thoughts went wild! I envisioned a HUGE slip n slide that would put any store bought product to shame. And thus entered this awesome diy water park. No slip n’ slide could compete with it! Score for mom!
Here’s how to create your very own waterpark at home too!
DIY WaterPark
Materials:
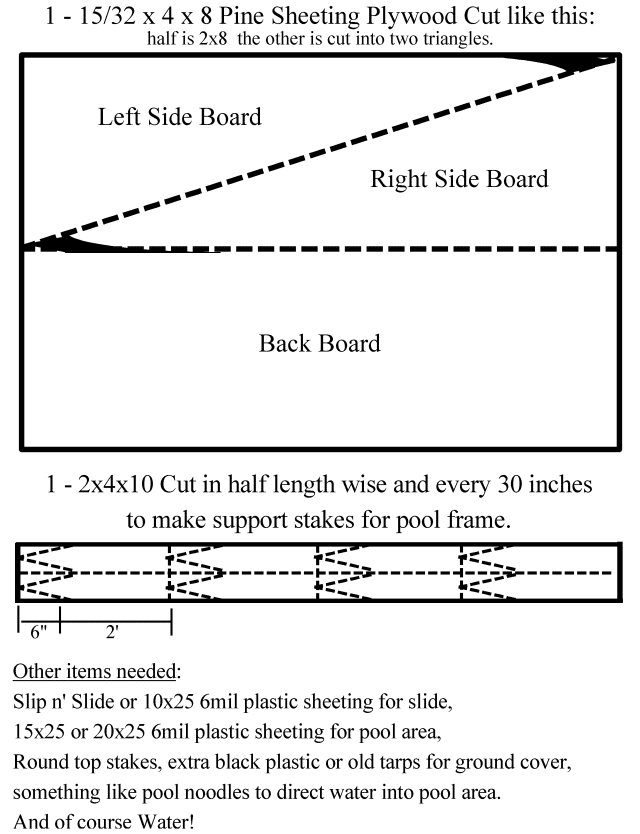
- One 4×8 sheet of pine sheeting
- A few 2x4s
- 20×25 6 mil plastic sheeting
- slip n slide
Instructions:
- Sand the cut boards to remove splinters.
- For safety, round the corners of the side boards.
- Roll up some tarps or use swimming pool noodles to guide the water into your pool area.
To build the frame:
- Place three stakes in the ground at the bottom of the hill.
- Screw the back board to the three stakes.
- Next mark the place for the side boards making sure the corners meet closely to corners of the back board.
- Place two stakes on each side board. They only need to go in the ground about 6 inches.
Prepare the ground:
Before putting down the plastic you need to cut the grass as short as possible using a weed eater. Rake all the slide and pool area clear of debris, looking carefully for items that might poke through and hurt the children.
Lining ground:
To extend the life of your plastic, you need to layer the pool and slide area with a ground cover of some sort. Place a tarp or extra sheet of plastic down; first lining the ground in the pool area, then moving up lining the ground to the start of the slide. If you layer the plastic as you go up the hill the water will run down over each layer instead of under each piece. If you use old tarps for this be sure to check for lose or sharp eyelets on the tarp. Each layer will need a stake to keep it from sliding down the hill, be sure to use something that is not sharp, but rounded on the top.
Making pool and slide:
- Spread the plastic sheeting over the back board and side boards of the pool area stretching it up the hill as far as possible.
- Smooth out the plastic and then stake down the plastic outside of the actual sliding area at the top with round headed stakes.
- Staple the plastic in place on the back edges of the boards.
- Place a slip n’ slide or another sheet of 6 mil plastic sheeting (10×20) to make a longer slide area.
One of the good things about this set up is once the pool area fills with water, you can turn off the sprinkler and they will still enjoy sliding since they will stay wet from the splash/pool area.
So get creative moms! You may already have things you can use to build a mini water park in your own backyard!
Turn on the water and let the memories begin!
*Affiliate links have been added to help you make the perfect water park for your kids!*


